Conas línte greille a fheiceáil idir teachtaireachtaí ríomhphoist in Outlook?
Mar is eol duit, tá línte eangaí idir teachtaireachtaí ríomhphoist le scaradh ar liosta ríomhphoist Microsoft Outlook. Ní amháin gur féidir leat na línte greille seo a cheilt nó a thaispeáint, ach stíleanna línte eangaí a athrú freisin. Is rang teagaisc éasca é seo chun stíleanna línte greille a thaispeáint, a cheilt agus a athrú idir teachtaireachtaí ríomhphoist ar liosta ríomhphoist Microsoft Outlook.
- Uathoibriú ríomhphost le Auto CC / BCC, Auto Ar Aghaidh le rialacha; seol Freagra Auto (As Oifig) gan freastalaí malartaithe a bheith ag teastáil...
- Faigh meabhrúcháin cosúil le Rabhadh BCC nuair a thugann tú freagra ar gach duine agus tú ar an liosta BCC, agus Meabhraigh Nuair a bhíonn Ceangaltáin ar Iarraidh le haghaidh ceangaltán dearmadta...
- Feabhas a chur ar éifeachtacht ríomhphoist le Freagra (Gach) Le Ceangaltáin, Auto Cuir Beannacht nó Dáta & Am isteach i Síniú nó Ábhar, Freagair Ríomhphoist Il...
- Sruthlínigh ríomhphost le Ríomhphoist a Athghairm, Uirlisí Ceangail (Comhbhrúigh Uile, Sábháil Uile...), Bain Dúblaigh, agus Tuarascáil Thapa...
Chun stíleanna línte greille a thaispeáint, a cheilt nó a athrú ar liosta ríomhphoist Microsoft Outlook, déan é mar a leanas le do thoil:
Céim 1: Aistrigh chuig amharc an Phoist le cliceáil ar an mail sa Phána Nascleanúna, agus ansin roghnaigh an fillteán ríomhphoist ina bhfeicfidh tú línte greille idir teachtaireachtaí ríomhphoist.
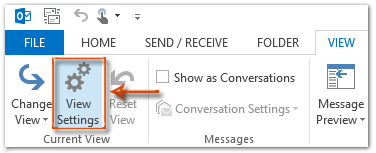
Céim 2: Oscail an bosca dialóige socruithe Advanced View:
- In Outlook 2007, cliceáil ar an Amharc > Amharc Reatha > Saincheap an Amharc Reatha.
- In Outlook 2010 agus 2013, cliceáil ar an Féach ar na Socruithe cnaipe ar an Amharc Tab.
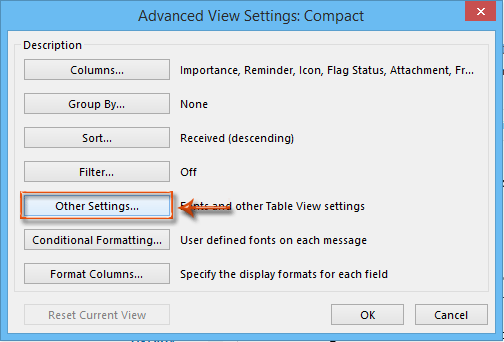
Céim 3: Sa bhosca dialóige aníos, cliceáil ar an Socruithe Eile cnaipe.
Céim 4: Sa bhosca dialóige Socruithe Eile, cliceáil ar an Stíl líne eangaí: bosca, agus roghnaigh ceann amháin de stíl líne eangaí ar an liosta anuas.
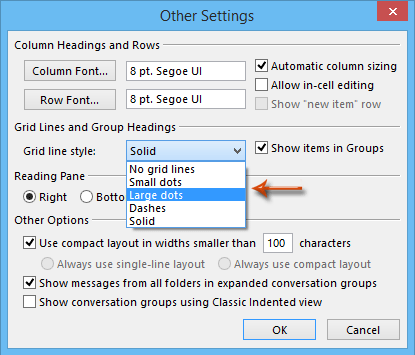
Chun línte eangaí a cheilt idir teachtaireachtaí ríomhphoist, roghnaigh na línte Níl greille le do thoil.
Chun stíleanna línte greille a athrú idir teachtaireachtaí ríomhphoist, roghnaigh ceann de na poncanna Beaga, poncanna móra, daiseanna nó Solad le do thoil.
Céim 5: Cliceáil ar fad OK cnaipí i ngach bosca dialóige.
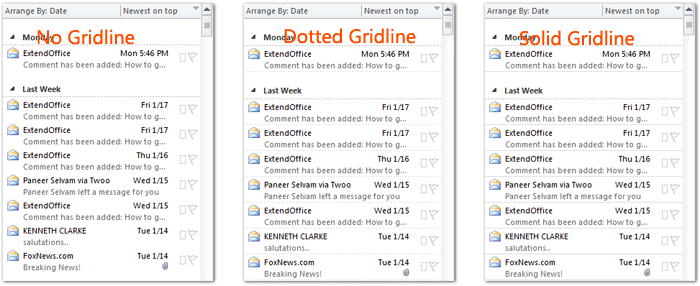
Go dtí seo, athraíodh stíl shonraithe na línte greille idir gach teachtaireacht ríomhphoist san fhillteán sonraithe. Féach an griangraf seo a leanas:
In Outlook 2010 agus 2013, is féidir leat socruithe amharc fillteán sonraithe a chur i bhfeidhm ar fhillteáin eile trí chliceáil ar an Athraigh Amharc > Cuir an Amharc Reatha i bhfeidhm ar Fhillteáin Ríomhphoist Eile ar an Amharc Tab.
Uirlisí Táirgiúlachta Oifige is Fearr
Kutools le haghaidh Outlook - Níos mó ná 100 Gnéithe cumhachtacha chun do Outlook a shárú
🤖 Cúntóir Ríomhphoist AI: Ríomhphoist pro toirt le draíocht AI - aon-cliceáil chun freagraí genius, ton foirfe, máistreacht ilteangach. Trasfhoirmigh ríomhphost gan stró! ...
📧 Uathoibriú Ríomhphoist: As Oifig (Ar fáil do POP agus IMAP) / Sceideal Seol Ríomhphoist / Auto CC/BCC de réir Rialacha Agus Ríomhphost á Sheoladh / Auto Ar Aghaidh (Ardrialacha) / Beannacht Auto Cuir leis / Scoilt Ríomhphoist Ilfhaighteoirí go huathoibríoch i dTeachtaireachtaí Aonair ...
📨 Bainistíocht Ríomhphost: Ríomhphoist a Athghairm go héasca / Bloc Ríomhphoist Scam ag Ábhair agus Daoine Eile / Scrios Ríomhphoist Dúblacha / Cuardach Casta / Comhdhlúthaigh Fillteáin ...
📁 Ceangaltáin Pro: Sábháil Baisc / Baisc Dícheangail / Comhbhrú Baisc / Auto Sábháil / Auto Dícheangail / Comhbhrúite Auto ...
🌟 Draíocht Chomhéadain: 😊Níos mó Emojis Pretty and Cool / Treisiú Do Tháirgiúlacht Outlook le Radhairc Tabbed / Íoslaghdaigh Outlook In ionad Deiridh ...
???? Wonders aon-cliceáil: Freagair Gach Duine le Ceangaltáin Isteach / Ríomhphoist Frith-Iascaireachta / 🕘 Taispeáin Crios Ama an tSeoltóra ...
👩🏼🤝👩🏻 Teagmhálaithe & Féilire: Baisc Cuir Teagmhálacha Ó Ríomhphoist Roghnaithe / Roinn Grúpa Teagmhála ar Ghrúpaí Aonair / Bain Meabhrúcháin Breithlá ...
Thar Gnéithe 100 Fan le do Thaiscéalaíocht! Cliceáil Anseo le Tuilleadh Amach.

