Conas cuntas a bhaint ach a ríomhphoist a choinneáil in Outlook?
Samhlaigh go bhfuil cuntais ríomhphoist iolracha socraithe agat i Microsoft Outlook, ach faigh amach gur annamh a úsáideann tú cuid acu. Seans go smaoineofá ar na cuntais nach bhfuil chomh gníomhach sin a bhaint. De ghnáth, má scriostar cuntas ríomhphoist ó Microsoft Outlook, baintear na ríomhphoist a bhaineann leis. Mar sin féin, déanfaidh an t-alt seo tú a threorú trí theicnící éagsúla chun deireadh a chur le cuntais ríomhphoist ó Microsoft Outlook agus a gcuid teachtaireachtaí á gcaomhnú.
- Uathoibriú ríomhphost le Auto CC / BCC, Auto Ar Aghaidh le rialacha; seol Freagra Auto (As Oifig) gan freastalaí malartaithe a bheith ag teastáil...
- Faigh meabhrúcháin cosúil le Rabhadh BCC nuair a thugann tú freagra ar gach duine agus tú ar an liosta BCC, agus Meabhraigh Nuair a bhíonn Ceangaltáin ar Iarraidh le haghaidh ceangaltán dearmadta...
- Feabhas a chur ar éifeachtacht ríomhphoist le Freagra (Gach) Le Ceangaltáin, Auto Cuir Beannacht nó Dáta & Am isteach i Síniú nó Ábhar, Freagair Ríomhphoist Il...
- Sruthlínigh ríomhphost le Ríomhphoist a Athghairm, Uirlisí Ceangail (Comhbhrúigh Uile, Sábháil Uile...), Bain Dúblaigh, agus Tuarascáil Thapa...
Bain cuntas ach coinnigh a ríomhphost tríd an mbunchomhad sonraí a shábháil
Tabharfaidh an modh seo treoir duit cuntas ríomhphoist a bhaint de Microsoft Outlook, ach gach mír den chuntas ríomhphoist seo a choinneáil i Microsoft Outlook.
Nóta Tábhachtach: Tá an nós imeachta seo deartha le haghaidh cuntais ríomhphoist a úsáideann comhaid sonraí .pst. Má oibríonn do chuntas ar chomhaid .ost, cinntigh go thiontú agus iad a onnmhairiú mar .pst ar dtús. Tá an chéim seo ríthábhachtach chun nach gcaillfidh tú aon sonraí ríomhphoist nuair a théann tú ar aghaidh le baint an chuntais.
- Oscail an Socruithe Cuntais bosca dialóige trí chliceáil Comhad > info > Socruithe Cuntais > Socruithe Cuntais.

- sa Socruithe Cuntais bosca dialóige, ar an Ríomhphost tab, lean na céimeanna seo:
- Roghnaigh an cuntas ríomhphoist a bhainfidh tú. Cinntigh go bhfuil baint ag an gcuntas a roghnaíonn tú le comhad sonraí .pst. Má tá sé nasctha le comhad .ost, d'fhéadfadh go gcaillfí gach ríomhphost má bhaintear an cuntas.
- Cliceáil ar an Bain cnaipe.
- Cliceáil ar an Dún cnaipe ag bun chun an bosca dialóige a fhágáil.

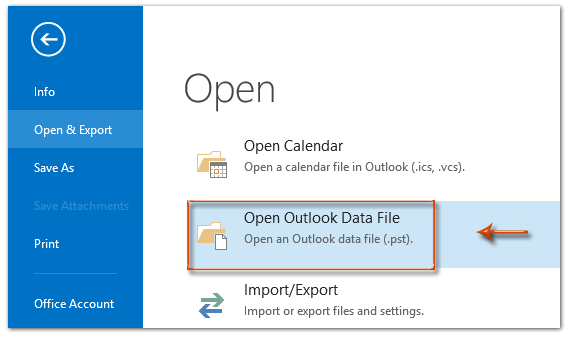
- Anois tá tú ar ais go dtí an príomh-chomhéadan de Outlook. Cliceáil Comhad > Oscailte & Easpórtáil > Oscail Comhad Sonraí Outlook.
- Sa pop-up Oscail Comhad Sonraí Outlook fhuinneog, aimsigh an comhad sonraí is mian leat a rochtain. Roghnaigh é, agus ansin cliceáil ar an Oscail cnaipe. Leid: Má tá do chomhad .pst stóráilte i suíomh neamh-réamhshocraithe, déan nascleanúint chuig an bhfillteán sonrach sin chun an comhad .pst a oscailt.

Toradh
Tá an cuntas ríomhphoist bainte de do Microsoft Outlook anois; áfach, fanann na fillteáin a bhaineann leis an gcuntas seo le feiceáil agus inrochtana sa phána Nascleanúna.
Bain cuntas ach coinnigh a ríomhphost trí chóipeáil agus a ghreamú
I ndáiríre, sula mbaintear cuntas ríomhphoist ó Microsoft Outlook, is féidir linn a ríomhphoist go léir a shábháil i bhfillteáin eile trí chóipeáil agus ghreamú de láimh. Seo treoir mhionsonraithe chun é seo a dhéanamh:
- Oscail an fillteán ríomhphoist sa Phána Nascleanúna a bhaineann leis an gcuntas atá beartaithe agat a bhaint ina bhfuil na ríomhphoist is mian leat a chaomhnú.

- Preas Ctrl + A chun na ríomhphoist go léir a roghnú san fhillteán oscailte.
- Preas Ctrl + C chun na teachtaireachtaí ríomhphoist seo a chóipeáil.
- Déan nascleanúint go dtí an fillteán inar mian leat na ríomhphoist seo a aistriú. I mo shampla, d'osclódh mé an Bosca Isteach de chuntas ríomhphoist difriúil mar a thaispeántar thíos.

- Preas Ctrl + V chun gach teachtaireacht ríomhphoist cóipeáilte a ghreamú isteach san fhillteán oscailte seo.
Leid:
- Déan céimeanna 1 go 5 arís chun teachtaireachtaí ríomhphoist a bhogadh ó fhillteáin eile an chuntais atá á bhaint agat.
- Ní chuimsíonn an modh seo fofhillteáin. Le haghaidh ríomhphoist i bhfofhillteáin, beidh ort céimeanna 1 go 5 a mhacasamhlú do gach fofhillteán.
- Oscail an Socruithe Cuntais bosca dialóige trí chliceáil Comhad > info > Socruithe Cuntais > Socruithe Cuntais.
- sa Socruithe Cuntais bosca dialóige, ar an Ríomhphost tab, lean na céimeanna seo:
- Roghnaigh an cuntas ríomhphoist a bhainfidh tú.
- Cliceáil ar an Bain cnaipe.
- Cliceáil ar an Dún cnaipe ag bun chun an bosca dialóige a fhágáil.

Easpórtáil ríomhphoist chuig comhad PST roimh bhaint an chuntais
Chun ríomhphoist a choinneáil ó chuntas atá á bhaint agat in Outlook, is modh iontaofa é iad a onnmhairiú mar PST (Comhad Sonraí Outlook). Cruthaíonn an próiseas seo cúltaca de do r-phoist, ar féidir a rochtain fiú tar éis an cuntas a bhaint. Seo conas é a dhéanamh:
- Oscail an Treoraí Iompórtála agus Easpórtála bosca dialóige trí chliceáil Comhad > Oscailte & Easpórtáil > Iompórtáil & Easpórtáil.
- Sa draoi, roghnaigh Easpórtáil go comhad, agus cliceáil ar an Ar Aghaidh cnaipe.

- sa Easpórtáil chuig Comhad dialóg, roghnaigh Comhad Sonraí Outlook (.pst) > Ar Aghaidh.

- sa Comhad Sonraí Outlook Outport bosca dialóige, roghnaigh an cuntas ríomhphoist go mbainfidh tú a bhaint níos déanaí chun a chuid sonraí a onnmhairiú, a chinntiú Cuir fillteáin isteach san áireamh a sheiceáil, agus cliceáil Ar Aghaidh.

- Socraigh paraiméadair easpórtála mar seo a leanas:
- cliceáil Brabhsáil, roghnaigh fillteán chun an comhad PST a shábháil, agus ainmnigh an comhad.
- Roghnaigh an Ná easpórtáil míreanna dúblacha rogha.
- cliceáil Críochnaigh.

- An Cruthaigh Comhad Sonraí Outlook beidh dialóg le feiceáil:
- Chun pasfhocal a chur leis, cuir isteach é sa dá cheann Pasfhocal agus Fíoraigh Pasfhocal boscaí, ansin cliceáil OK.
- Chun gan pasfhocal a chur leis, cliceáil Cealaigh.

Tar éis na céimeanna seo a chomhlánú, is féidir leat dul ar aghaidh leis an nós imeachta atá leagtha amach sa mhodh tosaigh chun cuntas ríomhphoist atá ann cheana a scriosadh agus na bunríomhphoist á gcoinneáil.
Uirlisí Táirgiúlachta Oifige is Fearr
Kutools le haghaidh Outlook - Níos mó ná 100 Gnéithe cumhachtacha chun do Outlook a shárú
🤖 Cúntóir Ríomhphoist AI: Ríomhphoist pro toirt le draíocht AI - aon-cliceáil chun freagraí genius, ton foirfe, máistreacht ilteangach. Trasfhoirmigh ríomhphost gan stró! ...
📧 Uathoibriú Ríomhphoist: As Oifig (Ar fáil do POP agus IMAP) / Sceideal Seol Ríomhphoist / Auto CC/BCC de réir Rialacha Agus Ríomhphost á Sheoladh / Auto Ar Aghaidh (Ardrialacha) / Beannacht Auto Cuir leis / Scoilt Ríomhphoist Ilfhaighteoirí go huathoibríoch i dTeachtaireachtaí Aonair ...
📨 Bainistíocht Ríomhphost: Ríomhphoist a Athghairm go héasca / Bloc Ríomhphoist Scam ag Ábhair agus Daoine Eile / Scrios Ríomhphoist Dúblacha / Cuardach Casta / Comhdhlúthaigh Fillteáin ...
📁 Ceangaltáin Pro: Sábháil Baisc / Baisc Dícheangail / Comhbhrú Baisc / Auto Sábháil / Auto Dícheangail / Comhbhrúite Auto ...
🌟 Draíocht Chomhéadain: 😊Níos mó Emojis Pretty and Cool / Treisiú Do Tháirgiúlacht Outlook le Radhairc Tabbed / Íoslaghdaigh Outlook In ionad Deiridh ...
???? Wonders aon-cliceáil: Freagair Gach Duine le Ceangaltáin Isteach / Ríomhphoist Frith-Iascaireachta / 🕘 Taispeáin Crios Ama an tSeoltóra ...
👩🏼🤝👩🏻 Teagmhálaithe & Féilire: Baisc Cuir Teagmhálacha Ó Ríomhphoist Roghnaithe / Roinn Grúpa Teagmhála ar Ghrúpaí Aonair / Bain Meabhrúcháin Breithlá ...
Thar Gnéithe 100 Fan le do Thaiscéalaíocht! Cliceáil Anseo le Tuilleadh Amach.

