Conas gach cealla cumaiscthe in Excel a aithint agus a roghnú?
An bhfuil a fhios agat conas gach cealla cumaisc a aimsiú agus a roghnú in Excel? Seo trí bhealach tricky fionnuar chun gach cealla cumaisc a aithint agus a roghnú i rogha nó raon in Excel go tapa.

Sainaithin agus roghnaigh gach cealla cumaiscthe le Aimsigh ordú
Roghnaigh agus comhaireamh go tapa gach cealla cumaisc le Kutools le haghaidh Excel
Sainaithin agus roghnaigh gach cealla cumaiscthe le Aimsigh ordú
Is féidir leat na cealla cumaisc go léir a shainaithint agus a roghnú i mbileog oibre gníomhach le Aimsigh ordú leis na céimeanna seo a leanas:
1. Cliceáil ar an Baile > Faigh & Roghnaigh > Aimsigh a oscailt Aimsigh agus Ionadaigh bosca dialóige. Is féidir leat an Aimsigh agus Ionadaigh bosca dialóige le brú ar an Ctrl + F eochracha.
2. Cliceáil ar an déanta cnaipe sa bhosca dialóige, (Mura féidir leat an déanta cnaipe, cliceáil le do thoil ar an Roghanna cnaipe chun an dialóg a leathnú.) féach an scáileán:

3. Sa popping suas Faigh Formáid bosca dialóige, ach seiceáil an Cumaisc Cealla rogha sa Rialú téacs alt faoi Ailíniú cluaisín, agus cliceáil OK.

4. Anois téann tú ar ais chuig an Aimsigh agus Ionadaigh dialóg, cliceáil Faigh Gach cnaipe. Tá na cealla cumaisc uile liostaithe ag bun an bhosca dialóige seo. Roghnaigh na torthaí aimsithe go léir agus coinnigh síos an Shift eochair.
Anois roghnaítear gach cealla cumaiscthe i mbileog ghníomhach nuair a roghnaíonn tú na torthaí aimsithe go léir. Féach an pictiúr:

Leid: Mura dteastaíonn uait ach cealla cumaiscthe a aithint, a aimsiú agus a roghnú i rogha, ní mór duit an raon a roghnú ar dtús.
Roghnaigh agus comhaireamh gach cealla cumaiscthe le Kutools le haghaidh Excel
Kutools le haghaidh Excel's Roghnaigh Cealla Cumaisc cuideoidh uirlis leat na cealla cumaisc go léir a shainaithint, a aimsiú agus a roghnú i rogha gan ach cliceáil amháin.
| Kutools le haghaidh Excel : le níos mó ná 300 breiseán áisiúil Excel, saor in aisce le triail gan aon teorannú i 30 lá. |
Tar éis a shuiteáil Kutools le haghaidh Excel, déan mar a leanas le do thoil :( Íoslódáil saor in aisce Kutools le haghaidh Excel Anois! )
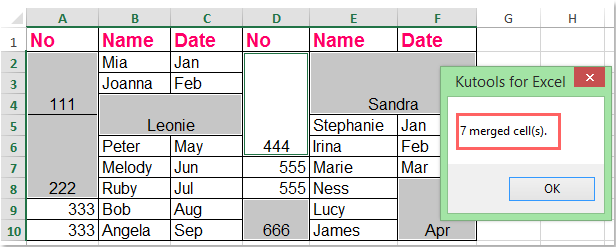
1. Roghnaigh an raon sonraí a theastaíonn uait na cealla cumaiscthe a roghnú.
2. Cliceáil Kutools > Roghnaigh > Roghnaigh Cealla Cumaisc, féach ar an scáileán:

3. Agus roghnaíodh na cealla cumaisc uile sa roghnú ag an am céanna, agus déantar líon na gcealla cumaiscthe a chomhaireamh freisin, féach an scáileán:
Sainaithin gach cealla cumaiscthe le cód VBA
VBA 1: Gach cealla cumaiscthe a shainaithint agus aird a tharraingt orthu
1. Coinnigh síos an ALT + F11 eochracha, agus osclaíonn sé an Microsoft Visual Basic d’Fheidhmchláir fhuinneog.
2. Cliceáil Ionsáigh > Modúil, agus greamaigh an macra seo a leanas sa Modúil Fuinneog.
Sub FindMergedcells()
'updateby Extendoffice
Dim x As Range
For Each x In ActiveSheet.UsedRange
If x.MergeCells Then
x.Interior.ColorIndex = 8
End If
Next
End Sub
3. Brúigh an F5 eochair chun an macra seo a rith. Déantar gach cealla cumaiscthe sa bhileog oibre gníomhach a shainaithint agus a aibhsiú, féach an scáileán:
VBA 2: Gach cealla cumaiscthe a shainaithint agus a liostáil
1. Coinnigh síos an ALT + F11 eochracha, agus osclaíonn sé an Microsoft Visual Basic d’Fheidhmchláir fhuinneog.
2. Cliceáil Ionsáigh > Modúil, agus greamaigh an macra seo a leanas sa Modúil Fuinneog.
Sub ListMergedcells()
'updateby Extendoffice
Dim x As Range
Dim sMsg As String
sMsg = ""
For Each x In ActiveSheet.UsedRange
If x.MergeCells Then
If sMsg = "" Then
sMsg = "Merged cells:" & vbCr
End If
sMsg = sMsg & Replace(x.Address, "$", "") & vbCr
End If
Next
If sMsg = "" Then
sMsg = "No merged cells."
End If
MsgBox sMsg
End Sub
3. Brúigh an F5 eochair chun an macra seo a rith, liostaítear na cealla cumaisc go léir i mbosca dialóige aníos. Féach an pictiúr:

Earraí gaolmhara
Conas cealla a chumasc laistigh den bhileog oibre faoi chosaint in Excel?
De réir réamhshocraithe, ní cheadaíonn bileog oibre cosanta d’úsáideoirí cealla a chumasc. Mar sin féin, is féidir leat cealla a chumasc laistigh de bhileog oibre faoi chosaint le modh VBA mar a sholáthraímid san alt seo.
Conas cealla a chumasc i raon atá formáidithe mar thábla in Excel?
In Excel, is féidir leat roinnt cealla as a chéile a chumasc go héasca le ceann amháin leis an bhfóntas Merge & Center mar atá thíos an pictiúr a thaispeántar. Mar sin féin, ní féidir leis na cealla a chumasc i raon a bhí formáidithe mar thábla in Excel, an bhfuil aon chleas ann chun é a láimhseáil?
Conas cealla a chumasc gan an t-ábhar in Excel a lárú?
In Excel, nuair a dhéantar dhá chill nó níos mó a chumasc in Excel, is féidir leis an bhfeidhm Merge & Center cabhrú leat. Ach uaireanta, conas is féidir leat a dhéanamh mura dteastaíonn uait ach cealla a chumasc ach mura lárnaíonn tú an t-ábhar mar a thaispeántar thíos? Anseo, sa rang teagaisc seo, tugaim isteach na modhanna chun an post seo a réiteach in Excel.
Conas cealla a dhíspreagadh agus luachanna dúblacha a líonadh in Excel?
Má tá bileog oibre agat ina bhfuil go leor cealla cumaiscthe, agus anois ní mór duit iad a dhí-armáil agus na bunluachanna ó na cealla cumaiscthe a líonadh go huathoibríoch mar a thaispeántar na scáileáin scáileáin seo a leanas. Conas a d’fhéadfá déileáil go tapa leis an tasc seo?
Uirlisí Táirgiúlachta Oifige is Fearr
Supercharge Do Scileanna Excel le Kutools le haghaidh Excel, agus Éifeachtúlacht Taithí Cosúil Ná Roimhe. Kutools le haghaidh Excel Tairiscintí Níos mó ná 300 Ardghnéithe chun Táirgiúlacht a Treisiú agus Sábháil Am. Cliceáil anseo chun an ghné is mó a theastaíonn uait a fháil ...
")
Tugann Tab Oifige comhéadan Tabbed chuig Office, agus Déan Do Obair i bhfad Níos Éasca
- Cumasaigh eagarthóireacht agus léamh tabbed i Word, Excel, PowerPoint, Foilsitheoir, Rochtain, Visio agus Tionscadal.
- Oscail agus cruthaigh cáipéisí iolracha i gcluaisíní nua den fhuinneog chéanna, seachas i bhfuinneoga nua.
- Méadaíonn do tháirgiúlacht 50%, agus laghdaíonn sé na céadta cad a tharlaíonn nuair luch duit gach lá!
")