Ionchas: athraigh an fillteán ina stóráiltear earraí seolta
Mar is eol duit, sábhálfar teachtaireachtaí ríomhphoist a chuirtear isteach san fhillteán Míreanna Seolta go huathoibríoch. Ach anseo socraímid roinnt cleasanna maidir le conas an fillteán mír seolta réamhshocraithe a athrú, agus teachtaireachtaí ríomhphoist seolta a shábháil i bhfillteáin mhalartacha i Microsoft Outlook go héasca.
Athraigh an fillteán a sheoltar míreanna isteach nuair a bhíonn tú ag cumadh
Athraigh an fillteán stóráiltear gach earra a sheoltar isteach go huathoibríoch
- Uathoibriú ríomhphost le Auto CC / BCC, Auto Ar Aghaidh le rialacha; seol Freagra Auto (As Oifig) gan freastalaí malartaithe a bheith ag teastáil...
- Faigh meabhrúcháin cosúil le Rabhadh BCC nuair a thugann tú freagra ar gach duine agus tú ar an liosta BCC, agus Meabhraigh Nuair a bhíonn Ceangaltáin ar Iarraidh le haghaidh ceangaltán dearmadta...
- Feabhas a chur ar éifeachtacht ríomhphoist le Freagra (Gach) Le Ceangaltáin, Auto Cuir Beannacht nó Dáta & Am isteach i Síniú nó Ábhar, Freagair Ríomhphoist Il...
- Sruthlínigh ríomhphost le Ríomhphoist a Athghairm, Uirlisí Ceangail (Comhbhrúigh Uile, Sábháil Uile...), Bain Dúblaigh, agus Tuarascáil Thapa...
 Athraigh an fillteán a sheoltar míreanna isteach nuair a bhíonn tú ag cumadh
Agus teachtaireacht ríomhphoist á chumadh agat, is féidir leat fillteán malartach a shainiú ina stórálfar an ríomhphost seolta seo tar éis é a sheoladh.
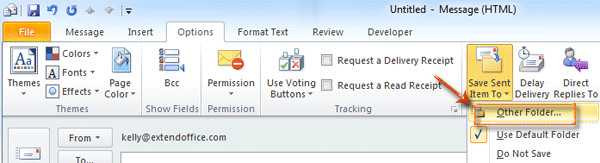
Céim 1: Cliceáil ar an Sábháil Mír Seolta chuig > Fillteán Eile sa Roghanna Breise grúpa ar an Roghanna cluaisín san Fhuinneog Teachtaireachta.
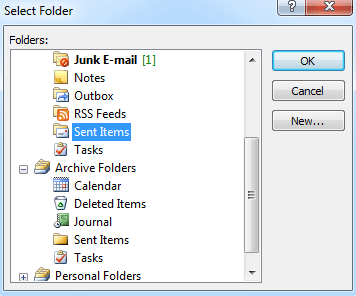
Céim 2: Sa bhosca dialóige Roghnaigh Fillteán, roghnaigh agus aibhsigh fillteán sa Fillteáin: bosca, agus cliceáil ar an OK cnaipe.
Tar éis duit an teachtaireacht ríomhphoist seo a sheoladh, stórálfar a cóip chuig an bhfillteán a roghnaigh tú i gCéim 2 go huathoibríoch.
Athraigh an fillteán stóráiltear gach earra a sheoltar isteach go huathoibríoch
I roinnt cásanna b’fhéidir gur mhaith leat an fillteán Mír Seolta réamhshocraithe a athrú, agus ligean do gach teachtaireacht ríomhphoist a sheoltar a stóráil i bhfillteán sonraithe go huathoibríoch. Tabharfaimid treoir duit chun é a bhaint amach le riail a chruthú in Outlook.
Sula gcruthóidh tú riail, ní mór duit aistriú go radharc an Phoist le cliceáil ar an mail sa Phána Nascleanúna.
Céim 1: Oscail an bosca dialóige Rialacha agus Foláirimh:
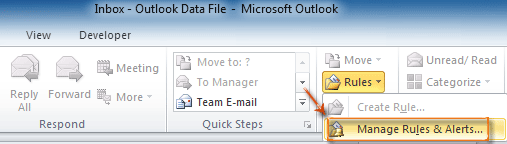
- In Outlook 2010 agus 2013, cliceáil ar an Rialacha > Bainistigh Rialacha & Foláirimh sa Bog grúpa ar an Baile Tab.
- In Outlook 2007, cliceáil ar an uirlisí > Rialacha agus Foláirimh.
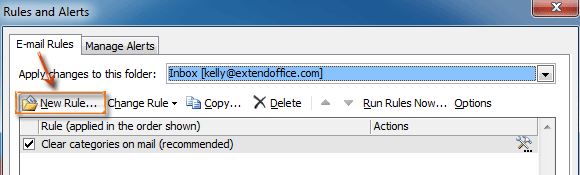
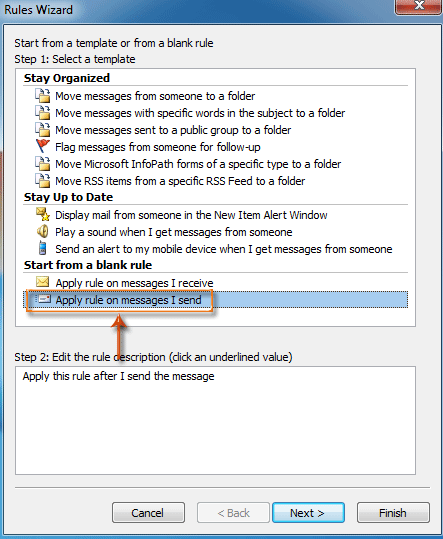
Céim 2: Sa bhosca dialóige Rialacha agus Foláirimh, cliceáil an Riail Nua cnaipe ar an Rialacha R-phoist Tab.
Céim 3: Sa bhosca dialóige Treoraí Rialacha, roghnaigh agus aibhsigh an Cuir riail i bhfeidhm maidir le teachtaireachtaí a sheolaim sa Tosaigh ó o riail bán alt, agus cliceáil ar an Ar Aghaidh cnaipe.
Céim 4: Sa bhosca dialóige Draoi Rialacha nua,
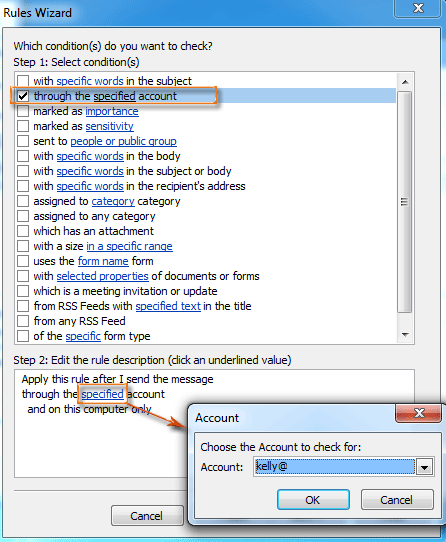
- seiceáil an tríd an gcuntas sonraithe rogha sa Céim 1: roghnaigh coinníollacha (anna) alt seo.
- Cliceáil ar an sonraithe sa Céim 2: Cuir an tuairisc riail in eagar alt seo.
- Sa bhosca dialóige Cuntas aníos, roghnaigh cuntas sa Cuntas: bosca agus cliceáil OK cnaipe.
- Cliceáil ar an Ar Aghaidh cnaipe.
Céim 5: Sa bhosca dialóige Draoi Rialacha nua,
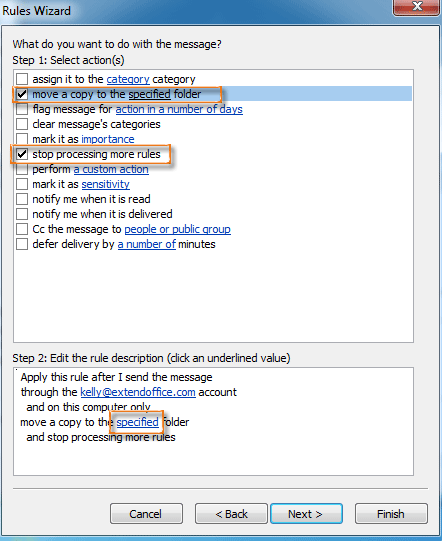
- seiceáil an bog cóip chuig an bhfillteán sonraithe rogha agus stop a phróiseáil níos mó rialacha rogha sa Céim 1: roghnaigh gníomh (anna) alt seo.
- Cliceáil ar an sonraithe sa Céim 2: Cuir an tuairisc riail in eagar alt seo.
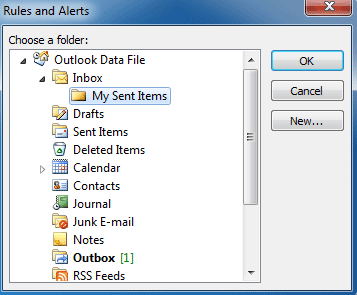
- Sa bhosca dialóige Rialacha agus Foláirimh, roghnaigh fillteán, agus cliceáil OK cnaipe.
- Cliceáil ar an Ar Aghaidh cnaipe.
Céim 6: Lean ar aghaidh le cliceáil ar an Ar Aghaidh cnaipí agus Críochnaigh cnaipe sna boscaí dialóige seo a leanas.
As seo amach sábhálfar gach teachtaireacht ríomhphoist a sheoltar chuig an bhfillteán a chumraigh tú i gCéim 5 go huathoibríoch.
Uirlisí Táirgiúlachta Oifige is Fearr
Kutools le haghaidh Outlook - Níos mó ná 100 Gnéithe cumhachtacha chun do Outlook a shárú
🤖 Cúntóir Ríomhphoist AI: Ríomhphoist pro toirt le draíocht AI - aon-cliceáil chun freagraí genius, ton foirfe, máistreacht ilteangach. Trasfhoirmigh ríomhphost gan stró! ...
📧 Uathoibriú Ríomhphoist: As Oifig (Ar fáil do POP agus IMAP) / Sceideal Seol Ríomhphoist / Auto CC/BCC de réir Rialacha Agus Ríomhphost á Sheoladh / Auto Ar Aghaidh (Ardrialacha) / Beannacht Auto Cuir leis / Scoilt Ríomhphoist Ilfhaighteoirí go huathoibríoch i dTeachtaireachtaí Aonair ...
📨 Bainistíocht Ríomhphost: Ríomhphoist a Athghairm go héasca / Bloc Ríomhphoist Scam ag Ábhair agus Daoine Eile / Scrios Ríomhphoist Dúblacha / Cuardach Casta / Comhdhlúthaigh Fillteáin ...
📁 Ceangaltáin Pro: Sábháil Baisc / Baisc Dícheangail / Comhbhrú Baisc / Auto Sábháil / Auto Dícheangail / Comhbhrúite Auto ...
🌟 Draíocht Chomhéadain: 😊Níos mó Emojis Pretty and Cool / Treisiú Do Tháirgiúlacht Outlook le Radhairc Tabbed / Íoslaghdaigh Outlook In ionad Deiridh ...
???? Wonders aon-cliceáil: Freagair Gach Duine le Ceangaltáin Isteach / Ríomhphoist Frith-Iascaireachta / 🕘 Taispeáin Crios Ama an tSeoltóra ...
👩🏼🤝👩🏻 Teagmhálaithe & Féilire: Baisc Cuir Teagmhálacha Ó Ríomhphoist Roghnaithe / Roinn Grúpa Teagmhála ar Ghrúpaí Aonair / Bain Meabhrúcháin Breithlá ...
Thar Gnéithe 100 Fan le do Thaiscéalaíocht! Cliceáil Anseo le Tuilleadh Amach.

